The Spyderbat Nano Agent is an extremely lightweight collector to access unprecedented insight from Linux systems and their causal activity and relationships. The Spyderbat Nano Agent leverages proven technology, Enhanced Berkeley Packet Filters or “eBPF”. The Spyderbat Nano Agent collects targeted, non-human readable data using eBPF from modern 64-bit Linux distributions for both x86 and ARM based architectures.
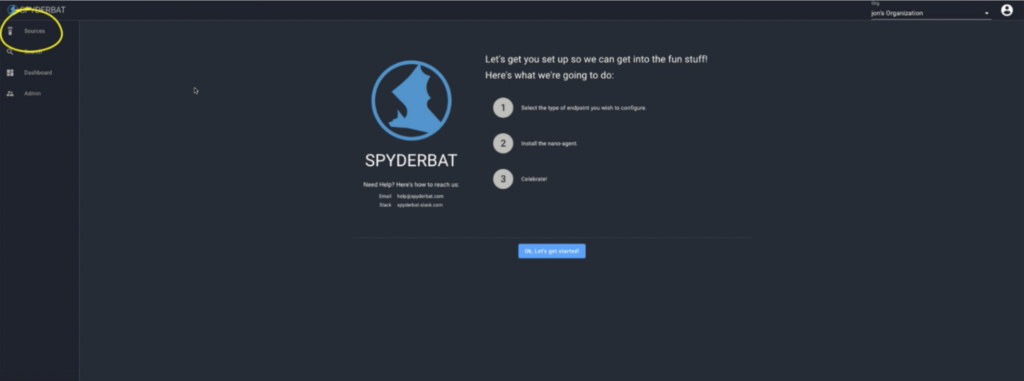
Step 1
Select “Sources” from the left-navigation menu. The wizard will launch automatically if you don’t have any agents installed yet. Doing so will take you to a brief wizard to guide you through the installation in a few simple steps. Click on the blue button to get started.
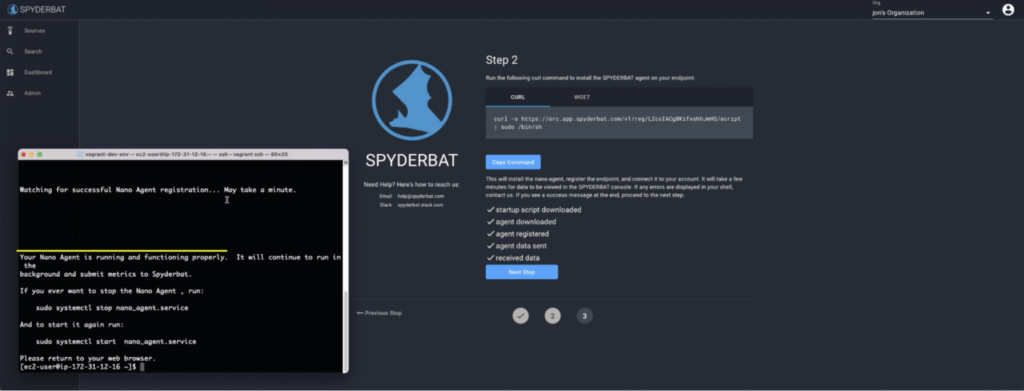
Step 2
You will see two choices regarding the target system you want to install the Nano Agent on.
- If you are installing on a virtual Linux system in AWS, select “EC2 instance” – where you’ll want to give the AWS instance an IAM (read only) role to grab metadata like Cloud Tags etc.
- If you are installing on any instance of Linux (virtual or physical) select “Standalone”.
Ensure you are installing on a Linux system supported by Spyderbat. You can view a complete list of supported versions here.
After you have made your selection, hit “next step”.
Note - The system you’re installing Spyderbat's Nano Agent should have outbound access on port 443 to https://orc.spyderbat.com

Step 3
In the next step, you’ll see a command you can copy and paste into a terminal on the target system. If you do not have Curl installed on your system, select the wget tab to copy this command instead.
Note - You will need Sudo permissions to install the Spyderbat Nano Agent
The UI provides you with feedback by displaying check marks of the install progress. Once the Spyderbat Nano Agent is installed, registers with Spyderbat, and it transmitting data, you will see that the agent was installed successfully both in your terminal and in the Spyderbat UI.
Once you see every checkmark displayed, click on ‘Next Step’ to be directed to the Sources page. You should now see the system you just installed the Nano Agent onto.
You should see that the source is healthy, the last active time should indicate recent activity and the sparkline will start to indicate a summary of system activity over time. You can rename the Source if necessary.
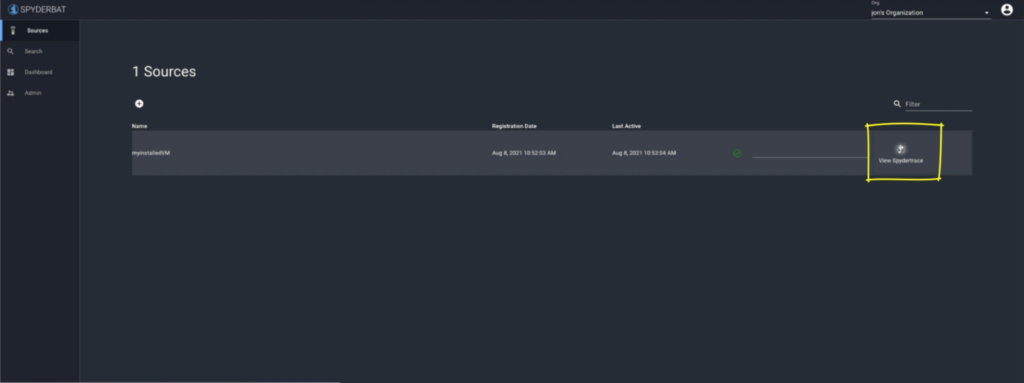
You are now ready to jump into an Investigation! Click on “View Spydertrace” link for the source will take you by default into the last hour of activity for that system in the “investigate” view.
Click here to learn more about Spyderbat Investigations
Congratulations – you installed the Spyderbat Nano Agent!
Happy tracing!
Write a comment